Friday, September 11, 2020

Love & Thanks Paper Piecing Peony Card


 Hi Stampers!

Well I have finally made it to card #3 from my initial YouTube Premier video.  I did the video a little over a month ago now (good grief where does the time go!).  But I have learned so much about blogging and many other cool tools that are all part of this adventure, and I am ready to get inspired to create the next project to post.  I think I will be able to get a better rhythm going.  So, stay tuned to see what is next!

But for today, as promised, here is the last remaining card from the Peony class.  This card uses the Peony builder dies which are four separate dies that you then piece together to make the gorgeous flower that is the central focus of my card.  

After I folded and burnished my Blushing Bride card stock base, I cut out the 4 parts of the peony flower using the Peony Dies with another piece of Blushing Bride card stock.  At the same time I cut out 3 leaf bases in Pear Pizzazz card stock and 3 leaf accent pieces from Mossy Meadow card stock.  I aligned and adhered the leaf accents to the leaf bases using Tombow Glue.  I sponged the leaves with Mossy Meadow ink and a Stampin' Sponge.  I also sponged around all the peony petals with Merry Merlot ink.  I took a Bone Folder and curled each leaf and petal slightly to bend them to look more realistic.  I then layered the peony pieces together using Mini Glue dots.  I glued the leaves to the back of the flower with Mini Glue dots.

I ran the Merry Merlot card stock piece through the Stampin' Cut & Emboss machine using the Dainty Diamonds 3D Embossing Folder. I lined up the Merry Merlot piece just below the first circle on the DSP (about 1/2" or so from the top) and adhered it with Stampin' Seal.  I centered the Gray Granite Shimmer Ribbon from this suite in the center of the Merry Merlot panel and adhered it to the back of the DSP with Stampin' Seal, then adhered that to the card front.  Next I centered a Square Vellum doily, aligning the tips with the ribbon.  I put some Tombow glue on an acrylic block and added a couple of drops from a water painter to dilute it some and dabbed glue in the center and on each corner of the back of the doily with a Sponge Dauber and glued it down.  Then I centered the peony over the doily and secured it with Stampin' dimensionals.  I stamped the Love & Thanks sentiment on a scrap of Blushing Bride and cut it out with the die from the Stitched So Sweetly Die set.  I made it smaller than the original die by cutting it where I wanted it on the top, then I lined it up at the bottom aligning the scallops and ran it through the Cut & Emboss again.  This gives you many more uses for your dies as it infinitely expands their uses.  And as I have said before, I am a more is better kind of girl, so infinitely more is a "Yes, Please!" kinda thing!  Once it was cut as I wanted it, I sponged around it with Merry Merlot ink and adhered it to the card front with Stampin' Dimensionals.  I added a few of the Petal Pink Elegant Faceted Gems that are part of the Peony suite using the Take Your Pick tool.   The final touch for the card front was to go around all of the Peony flower petals with a Wink of Stella glitter pen.  It adds such a shimmer and WOW factor!


For the card inside, I stamped a large peony bloom in Blushing Bride ink that I had stamped off once in the center of a Whisper White panel.  Over the top of that I stamped the sentiment for the card inside in Merry Merlot ink.  I adhered this panel to a Gray Granite mat and then into the card base inside.  On the envelope front, I stamped that same peony bloom again in full strength Blushing Bride ink, going off the lower left corner of the envelope.  I added more of the Peony Garden DSP to the envelope flap.  And just like that, card was done!  Pretty easy to put together once you get all the floral pieces cut out.  And that flower is just so gorgeous!  And I really think the dark contrast of the Merry Merlot really gave it a nice pop of color.  

If you want to watch the video that shows how I made it, this is actually the first card I put together so start at the beginning (around the 5 minute mark).  Here is the video:


Well, it's official.  This was the final installment of my maiden voyage with YouTube Premier!  If you want to replicate this card, all the paper cuts I used are listed below.  Also, if you need any of the supplies to make it, there are links below that will take you right to my store to purchase them.  I do hope you liked my cards and if you make any, I would love to see them!  

I will be back soon with another video and more card ideas.  So, until next time...

Happy Stamping!
Laurie B.

Card Measurements & Cuts (US measurements):

Blushing Bride Cardstock–5 ½”x8 ½”; scored @ 4 ¼” card base; 3 ¼” x 8 ½”–Peony die; 1 ½” x 2 ½”-sentiment
Pear Pizzazz – 1” x 8 ½” – leaves
Mossy Meadow – 1” x 8 ½” leaf accents
Merry Merlot – 1 @ 4” x 3” card front background mat; 1” x 2” – flower centers
Gray Granite – 1 @ 5 3/8” x 4 1/8” – card inside background mat
Whisper White – 1 @ 5 ¼” x 4” – card inside
Peony Garden DSP – 1 @ 5 ¼” x 4” – card front background; 1 @ 2 ¼” x 6” – envelope flap
Square Vellum Doily
¼” Gray Granite Shimmer Ribbon – 6" 
Product List

Thursday, September 10, 2020

Prized Peony Thank You Card using Masking Technique

Hi Stampers!

Well it has taken a little longer than a week to get the kinks worked out of my new blog.  I should know better than to commit to a date when learning something new!  But in my defense, I didn't realize the blog tool itself is only one part of this online blogging adventure!  I sure have learned a lot of cool new techie tools that help me do everything from learning how to take and edit photos (still learning that one, but improving I think), create watermarks, edit and link a supply list to make it easy for you to shop and get supplies you need quickly from my online store if you want to replicate a card and need something to finish it off.  Who knew creating the projects and filming the video while I do it would be the easy part!!  Needless to say, I have been keeping very busy.  So, maybe before the next class I have I will get all 3 of the cards I made in the last class posted; hopefully!  I have had to switch gears a couple of times to prep for an online Christmas card class and my regular Stamp Club classes I had scheduled and on my calendar.  But I am committed to getting all three of these from my initial YouTube Premier actually blogged!  Oh well, it will all get done eventually.  I have to keep reminding myself, baby steps...  So, now, before we all have retired from our day jobs and forgotten what I am even talking about, let me give you the scoop on card number two! 

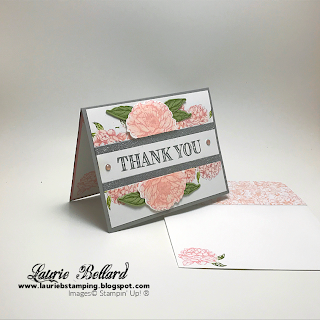
For the second card I did as part of the Peony class, I showed you how to mask off a card stock panel and stamp flowers to make a border. To start, I took a Whisper White panel and placed a 1" strip of copy paper and covered it with painters tape across the center, leaving a 1 1/4" border above and below.  This created the mask that allowed me to stamp the flowers across the panel stamping partially on the tape and the remainder on the panel above and below the tape.  I stamped the individual peony stamp that I colored with my Blushing Bride Stampin' Write marker and used the Old Olive Stampin' Write marker for the leaves.  After stamping the first one on the left top, going off the edge, I covered it with a piece of post-it note I had cut with the matching Peony die to create a mask.  This allowed me to stamp right next to the flower without stamping into the prior image.  I repeated this across the top and the bottom of the painters tape mask to create a border.  Then the magic happened!  Carefully, I pulled the painters tape off and you have the gorgeous flower design with the blank space between to stamp your sentiment.  So pretty!

Then I placed a strip of our Tear & Tape across the edge where the flowers stopped in the center (top and bottom) and I trimmed it off at each edge, then after removing backing, sprinkled Silver embossing powder over each strip and heated with a Heat Tool to melt it well.  It has a slightly speckled look as the Tear & Tape is slightly porous when heated, but it kind of gives it a cool look, I think.  Next, I rubbed the center with the embossing buddy (a retired product I sure hope Stampin' Up! brings back as it is an essential tool for crafters!) and stamped the Thank You sentiment from the Ornate Thanks stamp set in Basic Gray ink.  I adhered this panel to a Blushing Bride mat, then to the card front with Stampin' Seal.  I placed two of the Petal Pink Elegant Faceted Gems using my Take Your Pick Tool to assist with placement.

On two separate scraps of Whisper White card stock, I stamped two of the larger single peony blossoms in Blushing Bride ink.  I colored these in with the Light and Dark Petal Pink Stampin' Blends.  I cut them out using the corresponding die.  I then cut about 1/4 of the flower off each and adhered it along the straight edge in the center of the floral borders above and below the sentiment using Stampin' Dimensionals.  I also stamped 6 leaves on scrap of Pear Pizzazz card stock in Mossy Meadow ink and cut them out with the corresponding leaf dies.  I adhered these behind the large center flower at the top and bottom using Mini Glue dots.


On the card inside I stamped two more sentiments from the Ornate Thanks stamp set in Basic Gray ink.  I just love the pretty swirly writing in this stamp set and it has such nice sentiments!  I inked up the small peony stamp again with the Blushing Bride and Old Olive Stampin' Write markers and stamped this in the lower corner of the panel.  I adhered this panel to another Blushing Bride card stock mat and adhered it to the card inside with Stampin' Seal.  I used Wink of Stella on the card inside flower and on the two center flowers on the card front.  The final touch for the card inside was to adhere a 1/2" strip of DSP across the top of the card inside aligning with the Whisper White panel.


I repeated the inking and stamping of the single peony flower on the lower left corner of the envelope front using Blushing Bride and Old Olive Stampin' Blends markers.  On the envelope flap, I adhered a piece of the Peony Garden DSP with Tombow glue.

And there you have it!  Just like that, card number 2 was done!  Just one more to blog and I will finally officially have my first YouTube Premier all blogged!  Whoop!

Below is the video from this class with all three cards shown that I am blogging as my initial official blog launch.  Remember, I am learning this new skill too, and it is my first one, so it has some bloopers, if you will.  It will get better as I do more, I just know it!   I do hope you will stay with me through the learning curve.  To catch this card, go to 42.36 minutes into the video and this card starts there.

Video Link:

If you want to replicate this card, all the paper cuts I used are listed below.  Also, if you need any of the supplies to make it, there are links below that will take you right to my store to purchase them.  I hope you like this card.  It is such a pretty stamp set and matching die set; I think it is just so versatile and gorgeous!

Until next time...

Happy Stamping!

Laurie

Card Measurements & Cuts (US measurements):

Gray Granite card stock – 8 ½” x 5 ½”, scored at 4 ¼” for card base
Blushing Bride card stock – 1 @ 5 3/8” x 4 1/8”– card inside mat
Whisper White card stock –2@ - 5 ¼”  x 4” – card front & inside;” 2 ½” x 5” – card front large flowers
Pear Pizzazz card stock – 1 @ ½” x 8 ½” leaves
Peony Garden Designer Series Paper (DSP) – ½” x 4” card inside decoration panel; 2 ¼” x 6” – envelope flap

Product List